Modern Lattice Finished (and a tutorial)
9:30 AM
Last week we finally got the modern lattice along the garage started. I really liked the look of horizontal boards evenly spaced out. Here are a few inspiration pieces from pinterest.
Source: cocokelley.blogspot.com via Nikki on Pinterest

So here are my steps to take this:
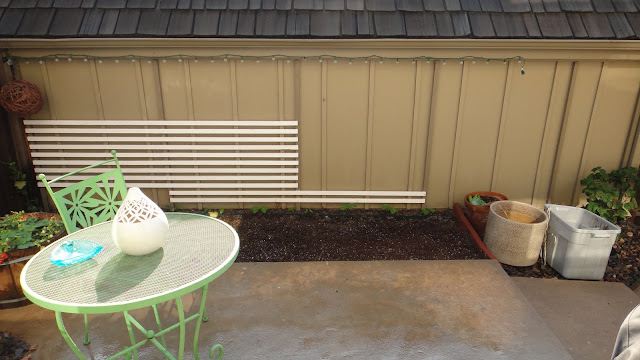
To this:
I am sure you don't need me to hold you hand while painting boards, and probably don't really want to read much more about it so I'll move on. You'll need something to attach your boards to. So I measured the height of my garage wall and planned how the boards would be laid out. I decided to do 6 vertical boards spaced out 4' with the boards being centered on the 4' mark. I also wanted them spaced out from the garage so that some kind of climbing plant could weave in and out of the boards. So, once you have 6 vertical boards cut to size, cut 12 scrap pieces of the same wood about 2" tall. Then pre-drill and pre-screw them together close to the top and bottom of your longer board. If you can, plan out where the horizontal boards will end up so that you can still have access to these screws in case you want to take it off later without deconstructing the whole thing.
It also helps keep your seams even if you use that same scrap on the end to line everything up like so. But make sure it rests on 2 boards that are already attached.
Now do that over and over again about 50 million times. Don't worry, it goes by pretty quick. Even quicker if you have a helper to hold the other end of the board for you. Here are a few progress shots which also might indicate how many boards I bought at a time.
And a little update on my moon flowers! They are starting to send out climbers.
Since my wall didn't measure out into equal 8' sections I had to cut some shorter boards for the very last section. They needed to be 26" long each, so unfortunately I could only get 3 pieces out of my 8' length of board. Please ignore the missing board and the un-attached board. I ran out of wood and that red brick thing that is keeping the dirt from washing into our newly cleaned rocks was in the way. So I'll get to those later.
Speaking of the red brick things, they have become very important lately whist helping us figure out our next step in the back yard makeover. Can you guess what it might be?
If you guessed drainage you guessed right, if not, you can play again next time. As you can see we have gotten some rain recently. And if you're familiar with Denver or Colorado then you realize that this is some crazy rain. We have had these crazy thunderstorms with torrential rain every night for at least a week now. The ground can't really take any more water and all our plants are drowning. So far we are thinking of putting a french drain under the grass area and directing the water out under the fence next to the gate. That is what most of our other neighbors have going on. I think it's a pretty common problem with the house and garage sandwiching the yard and all. I may have to find a picture to better explain it to Matt, every time I try to explain it he doesn't get what I'm saying. I guess I'm not good at explaining things like that. True story, I even tried to compare it to sushi one time, who does that? Now I just tell him "It's that thing when you tie a string to a midget in a wind breaker and run through a field." He then corrects me by saying "no that's a human kite."
If that last conversation confused you take a minute to enjoy this clip of our favorite Weekend Update correspondent Stefon!
Nikki
UPDATE! Here are a few new pictures of the lattice now that the moon flower plants have filled in a bit.


2 comments
Did you put some sort of weather proof poly on the boards so that they don't get all peely and icky by next summer?
ReplyDeleteVery very cool project!
My honeysuckle plants would love your lattice.
My summer has not been the same without Stefan! How am I supposed to find the hottest clubs?! Good job! Looks awesome!
ReplyDeleteHi! I love comments, they're the best!