DIY Recreate Your Favorite Skirt

1:00 PM


I'm not really sure I want to bring attention to this, but hopefully I've redeemed myself with this project. See two weeks ago Jenna, Ali, Jenna's friend Kim, and I embarked on a journey to make cute tank dresses that we saw on Pinterest. Theoretically they should have been easy peasy, done in 20 minutes. Wrong! It's not that they were all that difficult to make, but it did take way more than 20 minutes and the worst part about it was they looked terrible. Like we should be living with Alby on the compound with French braids that come down to our butts bad. I think the main reason that they look so bad is because I don't think you're supposed to sew knit and woven fabrics together. On a positive note, the fabric we bought was completely salvageable. The only thing I cut off my initial 2 yard purchase was an 8 inch strip to make a sash.


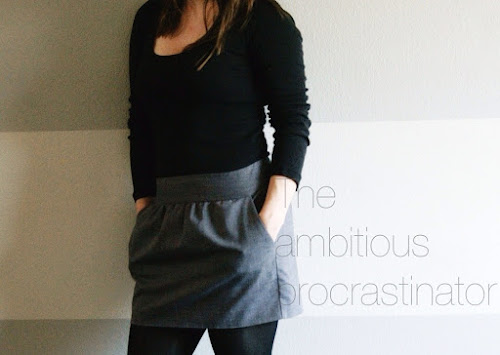
Now for the redemption portion of the show. Meet my favorite skirt. It's a short skirt from BCBG that looks great with tights and a fitted t-shirt. The best thing about this skirt is that it has pockets! Big pockets too, not those silly little girl pockets that barely hold a tube of Chapstick. So I said to myself, "why not make another one?"


I came up with the idea of using masking tape to create a pattern since its pretty pliable and easy to work with. I basically taped over each section of fabric individually and then trimmed the extra tape along all the seams. Once I had all my pattern pieces I stuck the tape onto that thin paper stores like to wrap glass stuff up in. It kinda feels like newspaper, without all the gross news print getting all over your fingers. Once the pattern was on the paper I measured a 1/2" seam allowance all the way around and cut it out. (Disclaimer: I copied the pattern for this skirt like 2 years ago and therefore have no pictures of this portion. Lucky for you it is the easy part, and if you need help all you need to do is ask me!)


After making your pattern pieces and cutting everything out you'll need to study the original to figure out the best way to put it together. Looking at my skirt the pockets seemed like the best place to start.


They lay flat and have the same fabric on the inside a little so that you don't see the lining fabric. I sewed the part that shows to the actuall pocket fabric first. Then I sewed a little strip that you can't see in the picture above, but it is there to make the front seam of the pocket look nice. (I drew on the pictures with a yellow line to help you see what I'm talking about)


Once I pressed the seam over I sewed the seam allowence to that little strip at the front of the pocket, just like on my original skirt (the pocket on the left). Now place the back side of the pocket to the front side of the pocket and stitch it closed (the pocket on the right). Just to make things stay together a little better I also sewed the pockets to the front panel of the skirt on the top and sides. I sewed within the seam allowance so you shouldn't be able to see them when it's all done.


Now that the pockets are done the next logical step is to attach the back panels at the sides. This part was pretty straight forward. After sewing the seam I went back over the edges with a zig-zag stitch to keep things neat and tidy. At this point I also sewed the lining to the skirt, and since it doesnt have pockets it was pretty straightforward.


The waist band at the top was also pretty easy. I cut out my pieces, sewed the sides together so I had a front band and a back band. Then sandwich them together and sewed the tops together. The hardest part was pressing the seam along the top over to one side. And like the little strip along the front of my pocket I sewed the seam allowance to the fabric that would be on the inside of the skirt to keep things laying nicely.


Attaching the waist band to the skirt and lining took a little figuring out, but here's what I came up with. Sew the front facing band to the skirt, and then the back to the lining. Since the edges of the lining and back half of the waist band were exposed on my grey skirt I finished it off witha zig zag seam Then press the seams all towards the lining.


The last part for the waist band was to sew it closed by running a stitch along the seam between the skirt and the waist band. If you keep your stitches right in the seam it will be practically invisible. For some reason I feel like calling this step stitch in the ditch, or something like that. Is that a thing?


We're in the home stretch now, all we've got left is the zipper and the hem. Just another disclaimer, zippers kinda scare me. So if you would like to see detailed instructions on how I installed this lovely exposed zipper look at this awesome tutorial. What I will show you is where I veered off course. First thing was I did not have any fusible iron tape. That is probably something a good sewer would have on hand. So I improvised and used a light spraying of self adhesive spray. It worked ok, but the teeth of the zipper were a little sticky too. Maybe I will pick up that fusible tape stuff next time I buy a zipper.


The only other improvised thing I did was the top. The tutorial didnt really elaborate on what to do with the top. I guess it would be different for the type or garment you're sewing, so I just took the advice from this tutorial and cut them even with my skirt and melted the ends with a lighter.


Finally, it time for the hem, which also means I'm almost done! For the lining I just folded a half inch over 2 times and stitched a normal stitch. But for the skirt hem I wanted to get a little fancy. First I ran the raw edge through the zig zag stitch to keep it from fraying and so it looks a little more fancy professional. Then I sewed some ribbon I had laying around to the edge. It always seems like there is something like this built into the hems of my nicer dresses and skirts.


After the ribbon it was as simple as pressing the hem under and painstakingly hand stitching the hem. I always hate sewing by hand, but I guess it's only the bottom. I'm so glad we don't live in the olden days where you had to sew your own clothes by hand all the time. Here's a side by side comparison.


Pretty legit, if I do say so myself! The only noticeable difference is my new skirt is just a teeny bit bigger than my old skirt, so I would probably only add a 5/8" seam allowance next time. Or who knows, maybe it will shrink up a little next time I wash it.

So, do you have an awesome skirt that you'd love to recreate? If you give it a shot just be patient, and if all else fails, leave me a comment or send me an email with your problem and I'll do my best to help you out. Oh, and go check out what Jenna did with her fabric from our dress fail and tell her I said Hi!

P.S. I also did a pretty water color technique manicure to match! (Inspired by a post by Sarah from Chalkboard Nails.)

You Might Also Like

20 comments

  1. Just in time for spring!! I love it. Also, I think youre much better at sewing than me. My stuff is largely improvised and janky, whereas yours looks super legit. xo!

    ReplyDelete
  2. Look at you, fancy-pants (or skirt)! I am impressed and love the fabric.

    ReplyDelete
    Replies
    1. Thanks Lauren! I picked up the fabric at Joann's in The Paso while I was visiting Jenna.

      Delete
  3. Super cute! Love those pockets!

    ReplyDelete
  4. Genius!! You make this look so easy!

    I love the end result, your new skirt (and the old one) are gorgeous :)

    ReplyDelete
  5. this is awesome! those picture crack me up haha. i would LOVE for you to link this post or any other posts you want to my weekend link party http://lovenotesbylauryn.blogspot.com/2012/04/spread-love-link-party-6.html it opens at midnight tonight, hope to see you there!
    {love} lauryn @ lovenotesbylauryn.blogspot.com

    ReplyDelete
  6. Laughed my butt off.

    Please do another one with the tape so we can see.

    ReplyDelete
    Replies
    1. I'll have to find something I want to recreate, but I'll keep my eyes open.

      Delete
    2. I can't wait to see how you use the tape to create a pattern. That TOTALLY has my interest piqued!

      Delete
    3. I can't wait for you to show us how to use tape to recreate an item. This has my interest piqued! I've sat down and used trial and error and that might make it easier...

      Delete
  7. Wow, great save! I might try to copy that. And the tape idea, genius! Also, those boots are amazing

    ReplyDelete
    Replies
    1. Thanks! Matt may call them my 'Peter Pan' boots but I still love them.

      Delete
  8. Super cute! What a great idea- love how your new skirt turned out. Perfect for Spring! If you have some time I'd love it if you'd stop by my blog and check out the giveaway I'm having for a Ramsign Home sign!

    ReplyDelete
  9. Brilliant idea for skirt. How can you have lovely nails and sew???

    ReplyDelete
  10. The thing about the initial Pinterest find is that it works if you're thin as a rail with relatively little boobage.

    ReplyDelete
    Replies
    1. Agreed! We also thought it might be cute on someone under the age of 2.

      Nikki

      Delete

Hi! I love comments, they're the best!

Like us on Facebook

Flickr Images

Enter your email address:

Delivered by FeedBurner