
Pinspired By: Macramé Plant Hangers
10:54 AM
This Pinspired By post is brought to you by...

I love the Pinterest Challenges that Sherry and Katie B host (along with 2 Rotating guest hosts Erin and Cassy) each season! I've been along for the ride since the beginning! Haha, that's not such a big claim since they've been doing it for less than a year, anyway here we go.
Lately I've been seeing a lot of these cute macramé plant hangers (here, here, and here)that I just love! I also really love my string of pearls succulent plants, but they are getting out of controll. Two birds, one stone, as they say. So here's the supplies minus the metal screening that I decided I needed half way through this project. I've got gravel, potting soil, string, glass bowls, and my string of pearls plant.

First take 4 equal lengths of the string and and cross the centers over each other like this.

Now think back to 5th grade, remember those plastic lanyard things you used to make, that's what we're doing here. I'm not even going to try to explain this, just look at the picture.
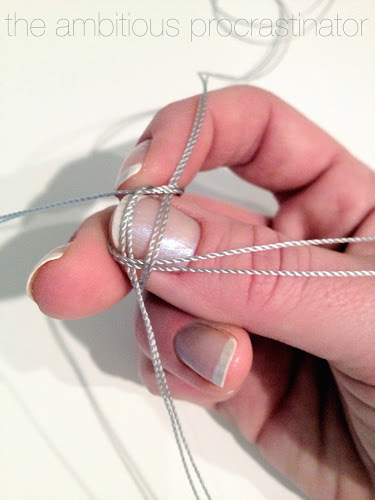
Once you have the base knot tied you need to create the cris crossed net to hold your bowl in place. Separate the strands that are together and tie the neighboring strings in a knot. I used an old hotel key card to keep my spacing even like this.

Do this all the way around and then repeat 2-3 times. I kept putting my empty bowl inside to see if I needed to do one more round.

Now that your plant hanger is finished, its time to get your plant ready. I read in this article that you can just snip off a strand of pearls, stick the cut end in the dirt, and it should grow. So once I prepared the bottom for drainage I did exactly that.


Getting the plant into the hanger was a little tricky. You want to spread out the netting so you can just set your bowl on top of it. And since the string of pearls are kinda delicate I piled them on top of the dirt so they wouldn't snag on the strings.

Now tie a loop at the top to hang it all from and go hang it in your favorite window!


I think I might play around with where they are, but overall I'm pleased as punch! So did you participate in the Pinterest Challenge? Make sure to check out some of the other entries, I'm sure there will be some pretty awesome things! Oh, and if you want to check out my favorites I have a board just for that on Pinterest!
One last thing, I'm planning on hosting a fun Instagram Photo Contest in the coming week or so, so stay tuned for details on that.


4 comments
If you are taking the time (and the cuuute pics) to attempt an explanation of a process, dismissing a finer point (oh, how the basic knot is tied) as "I'm not even going to try to explain this" is absolutely useless to anyone who didn't attend a school where the 5th grade had a curriculum somewhere above camp crafts. Thanks, though, for these lovely pictures of your process (as well as the finished product) which are completely without any practical use.
ReplyDeleteUnfortunately I have to agree with the post from March 10th.
ReplyDeleteMaybe try different colours of string for learning purposes if explaining it too hard?
ReplyDeleteThis comment has been removed by the author.
ReplyDeleteHi! I love comments, they're the best!