
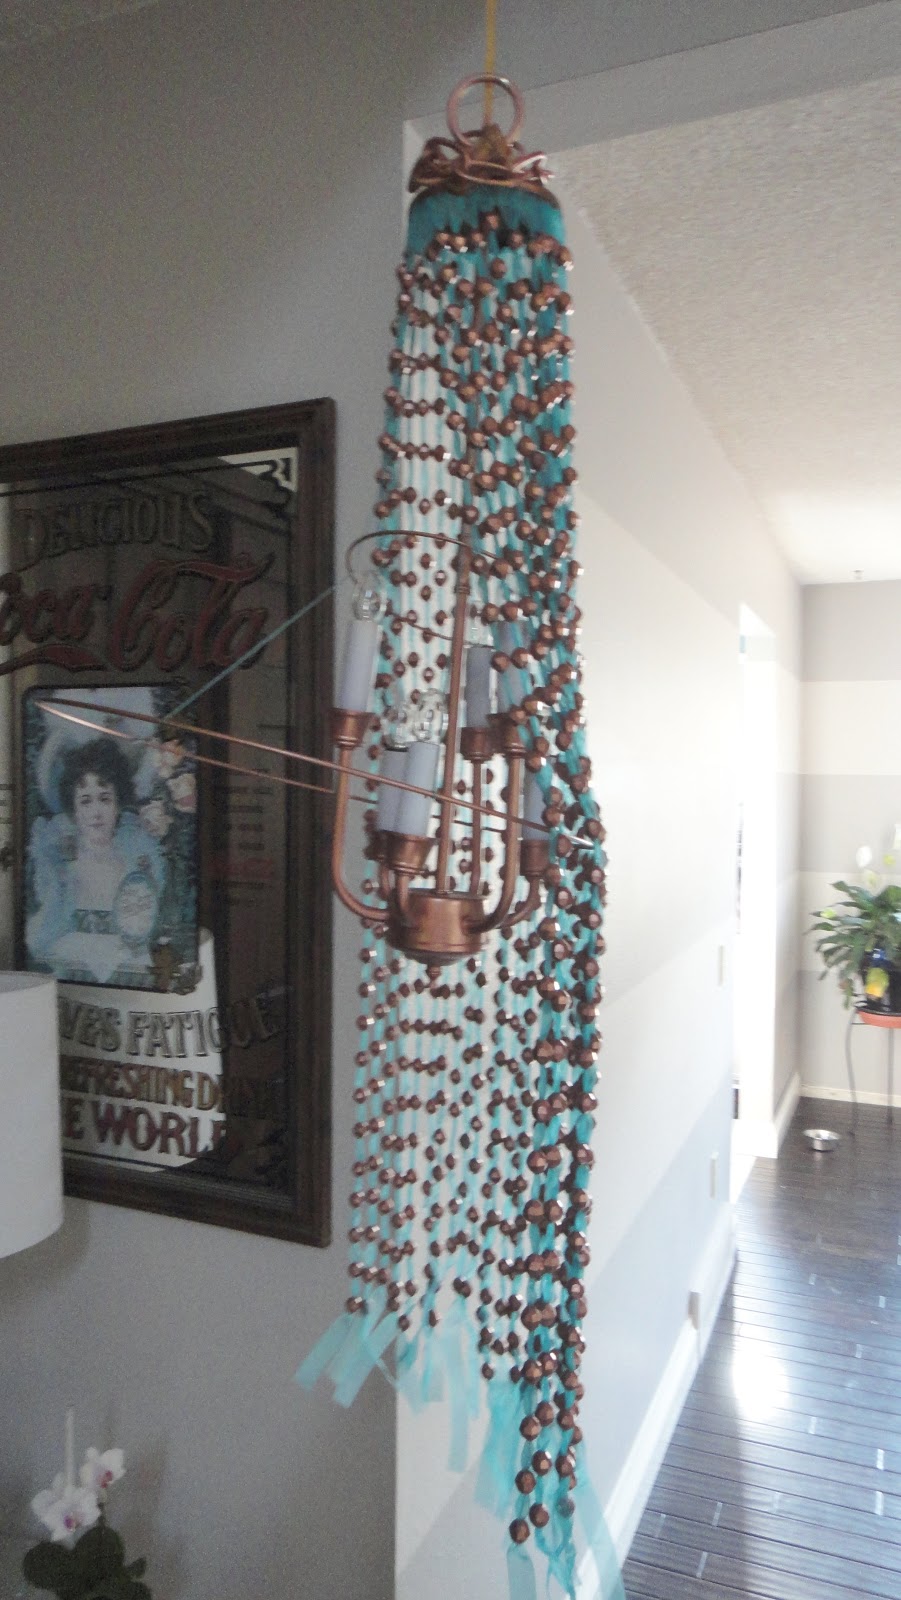
Fancy Schmancy Chandelier Completed!
10:22 PMIt's finished!!!


Next up was to get the light parts so that it would be functional. I picked up this old 80's dream for a steal, $5 to be exact. I have since seen about a million of these around various thrift stores. I also found out that the small hoop from my lamp shade fit almost exactly inside of one of the transition pieces on top, so I pulled that off and the actual chandelier part from the inside. I took them outside and turned them from brass, to copper with a little bit of the same spray paint that I used on the beads. I didn't get a before picture prior to taking it all apart picture, but here is what is left of it.


Now jump back the the strands of beaded. Once I was done stringing beads on a bunch of strands of ribbon I simply sewed the end of the ribbon to the smaller hoop at the top. I took the time to make sure I had them evenly distributed between the 3 strands of yarn so that my finished project would be pretty even. That was a complete waste of time, but more on that later. Once I had all the ribbons attached I mixed up some Gorilla Glue epoxy and glued the hoop inside of a cap that was part of the original chandelier that I purchased.

Let that sit for a while to harden up, then put the chandelier part inside. Using a clamp and our railing in the living room I was able to have it hanging for the rest of the assembly. This is where things became tricky. I had a terrible time keeping the lower hoop level. The strands of ribbon would slide around to one side and even when I was able to spread them out evenly it never stayed. Kinda like this.


Then I decided that maybe I should have the tails pointing upward instead so that it would look nicer.


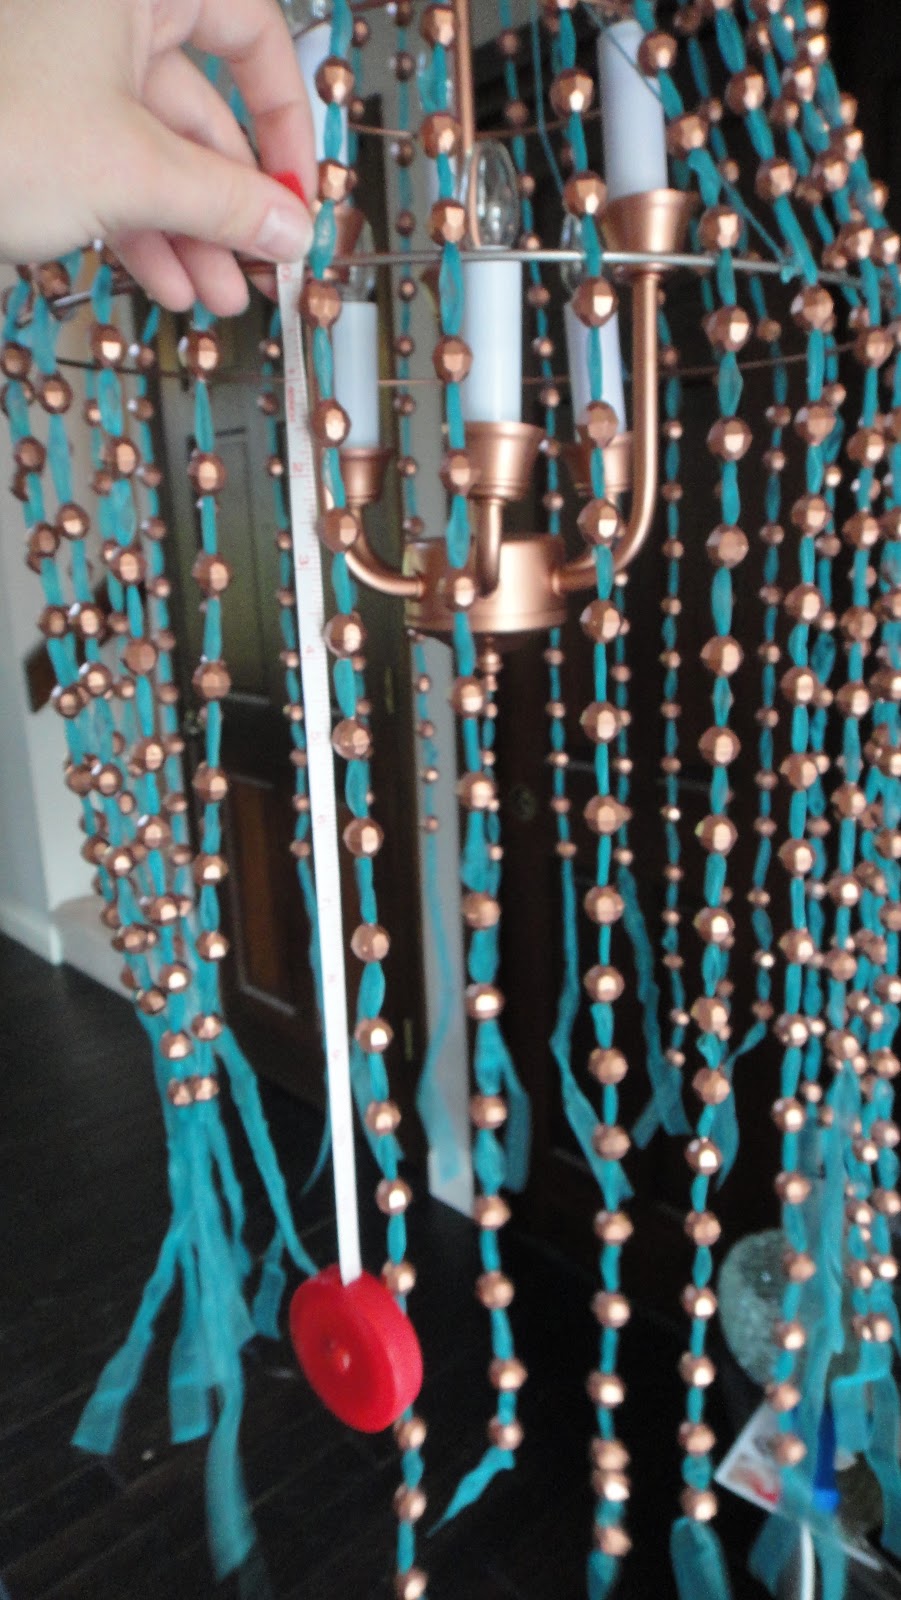
Now all I needed was to attach this to the bottom of the chandelier. I made another quick trip to Home Depot (why is Josh Temple never there?) to pick up to largish washers. I sprayed them with the copper paint and used the epoxy glue to sandwich them around the sewn together ribbon tails. Once it had dried I used an exacto knife and cut the ribbon out of the middle. It ended up like this.

Then I just unscrewed the little fancy nut off the bottom of the chandelier, this is where all the wiring is housed, swapped out the nipple for a longer one (you know, to accommodate all the fabric and 2 washers). Then I just slid the washers over the nipple and screwed the fancy nut thing back on and voila! Donezo.


Here it is again! I think it looks pretty fantastic. I may be partially biased, but who cares. And here is a quick shot of it during the day.


So, whatcha think? Do you love lighting as much as I do? Would you ever try to DIY your own fancy light? Have you already? If so, let's see what you got!
-Nikki
I am linking up to Tatertots & Jello's Weekend Wrap Up Party


25 comments
This comment has been removed by the author.
ReplyDeleteWow, that looks amazing!
ReplyDeleteThank you for sharing;)
I`m your latest follower!
Please come and visit my blog too, stay a while and maybe follow back;)
Lovely greetings...
http://pudel-design.blogspot.com/
Beautiful! Love the color combo and such ingenuity!
ReplyDeleteThanks for the props!! I'm on my way right now to check out you blog too!!
ReplyDeleteLOVE it! But phew, looks hard to do!
ReplyDeleteOh my gosh...wow.. wow..I love it!
ReplyDeleteI Sooooo love this. Copper is one of my favs!! And it always looks so good with blue! Keep up the great work.
ReplyDeleteAbsolutely gorgeous!!! I love the effect of the beads and ribbon - what a brilliant method! All the work was def. worth it!
ReplyDeletelove it! you did a great job :)
ReplyDeleteThe broken fingers were worth it. It's amazing.
ReplyDeleteTHAT IS AMAZING!! I love DIY projects!! Especially re-purposing things and making them even better! Hmm...gets me thinking... Could be fun to take your concept & make a fancy chandelier with a mix of ribbons and fishing wire with some clear bead/baubles & the metal ones? I know IT IS CLICHE, but I can just see a pink & sparkly one in my head that would be BEAUTIFUL! :o) Thanks for the inspiration!!
ReplyDeleteIt is indeed fancy, but I'm afraid it's lacking in schmancy.
ReplyDeleteHermosa te quedo la lampara, muy elegante y con buena terminacion, q cintas usasteso es tull?
ReplyDeleteI love your chandelier and for the honest account of your process. Your blog name cracks me up. I suffer from oops poverty optimistic planning syndrome and I often procrastinate long enough for a project to grow and change in my mind. Take care you awesome crafter.
ReplyDeletePardon me, spell check changed my wording. It should read overly optimistic planning syndrome. Thanks for sharing your talents.
Deletehttps://istanbulolala.biz/
ReplyDeleteF5VKSY
BBE1E
ReplyDeleteAfyon Evden Eve Nakliyat
Afyon Lojistik
Bayburt Lojistik
Çerkezköy Cam Balkon
Yenimahalle Parke Ustası
Malatya Evden Eve Nakliyat
Bursa Lojistik
Pursaklar Parke Ustası
Çankırı Lojistik
C754D
ReplyDeleteVan Evden Eve Nakliyat
Gate io Güvenilir mi
Çanakkale Şehir İçi Nakliyat
Siirt Evden Eve Nakliyat
Çanakkale Evden Eve Nakliyat
Poloniex Güvenilir mi
Bitci Güvenilir mi
buy testosterone propionat
Erzurum Şehir İçi Nakliyat
E641A
ReplyDeleteCointiger Güvenilir mi
Pitbull Coin Hangi Borsada
Adana Şehir İçi Nakliyat
İstanbul Evden Eve Nakliyat
Adana Parça Eşya Taşıma
Hakkari Evden Eve Nakliyat
Manisa Lojistik
Ardahan Parça Eşya Taşıma
Elazığ Lojistik
357D4
ReplyDeleteÇerkezköy Buzdolabı Tamircisi
Çerkezköy Organizasyon
Altındağ Fayans Ustası
Kırşehir Evden Eve Nakliyat
Altındağ Parke Ustası
Eryaman Boya Ustası
Çerkezköy Çelik Kapı
Etlik Boya Ustası
Ünye Organizasyon
E2E40
ReplyDeleteKarapürçek Parke Ustası
Ünye Koltuk Kaplama
Mexc Güvenilir mi
Burdur Evden Eve Nakliyat
Referans Kimliği Nedir
Silivri Cam Balkon
Mamak Parke Ustası
Ordu Evden Eve Nakliyat
Mersin Evden Eve Nakliyat
شركة تسليك مجاري بالهفوف r6wQ6PvRrL
ReplyDeleteRWYYDTNqnj
ReplyDeleteشركة مكافحة بق الفراش بالاحساء x9sycxEFU6
ReplyDeleteमहाकालसंहिता कामकलाकाली खण्ड पटल १५ - ameya jaywant narvekar कामकलाकाल्याः प्राणायुताक्षरी मन्त्रः JANUARY 2026
ReplyDeleteओं ऐं ह्रीं श्रीं ह्रीं क्लीं हूं छूीं स्त्रीं फ्रें क्रों क्षौं आं स्फों स्वाहा कामकलाकालि, ह्रीं क्रीं ह्रीं ह्रीं ह्रीं हूं हूं ह्रीं ह्रीं ह्रीं क्रीं क्रीं क्रीं ठः ठः दक्षिणकालिके, ऐं क्रीं ह्रीं हूं स्त्री फ्रे स्त्रीं ख भद्रकालि हूं हूं फट् फट् नमः स्वाहा भद्रकालि ओं ह्रीं ह्रीं हूं हूं भगवति श्मशानकालि नरकङ्कालमालाधारिणि ह्रीं क्रीं कुणपभोजिनि फ्रें फ्रें स्वाहा श्मशानकालि क्रीं हूं ह्रीं स्त्रीं श्रीं क्लीं फट् स्वाहा कालकालि, ओं फ्रें सिद्धिकरालि ह्रीं ह्रीं हूं स्त्रीं फ्रें नमः स्वाहा गुह्यकालि, ओं ओं हूं ह्रीं फ्रें छ्रीं स्त्रीं श्रीं क्रों नमो धनकाल्यै विकरालरूपिणि धनं देहि देहि दापय दापय क्षं क्षां क्षिं क्षीं क्षं क्षं क्षं क्षं क्ष्लं क्ष क्ष क्ष क्ष क्षः क्रों क्रोः आं ह्रीं ह्रीं हूं हूं नमो नमः फट् स्वाहा धनकालिके, ओं ऐं क्लीं ह्रीं हूं सिद्धिकाल्यै नमः सिद्धिकालि, ह्रीं चण्डाट्टहासनि जगद्ग्रसनकारिणि नरमुण्डमालिनि चण्डकालिके क्लीं श्रीं हूं फ्रें स्त्रीं छ्रीं फट् फट् स्वाहा चण्डकालिके नमः कमलवासिन्यै स्वाहालक्ष्मि ओं श्रीं ह्रीं श्रीं कमले कमलालये प्रसीद प्रसीद श्रीं ह्रीं श्री महालक्ष्म्यै नमः महालक्ष्मि, ह्रीं नमो भगवति माहेश्वरि अन्नपूर्णे स्वाहा अन्नपूर्णे, ओं ह्रीं हूं उत्तिष्ठपुरुषि किं स्वपिषि भयं मे समुपस्थितं यदि शक्यमशक्यं वा क्रोधदुर्गे भगवति शमय स्वाहा हूं ह्रीं ओं, वनदुर्गे ह्रीं स्फुर स्फुर प्रस्फुर प्रस्फुर घोरघोरतरतनुरूपे चट चट प्रचट प्रचट कह कह रम रम बन्ध बन्ध घातय घातय हूं फट् विजयाघोरे, ह्रीं पद्मावति स्वाहा पद्मावति, महिषमर्दिनि स्वाहा महिषमर्दिनि, ओं दुर्गे दुर्गे रक्षिणि स्वाहा जयदुर्गे, ओं ह्रीं दुं दुर्गायै स्वाहा, ऐं ह्रीं श्रीं ओं नमो भगवत मातङ्गेश्वरि सर्वस्त्रीपुरुषवशङ्करि सर्वदुष्टमृगवशङ्करि सर्वग्रहवशङ्करि सर्वसत्त्ववशङ्कर सर्वजनमनोहरि सर्वमुखरञ्जिनि सर्वराजवशङ्करि ameya jaywant narvekar सर्वलोकममुं मे वशमानय स्वाहा, राजमातङ्ग उच्छिष्टमातङ्गिनि हूं ह्रीं ओं क्लीं स्वाहा उच्छिष्टमातङ्गि, उच्छिष्टचाण्डालिनि सुमुखि देवि महापिशाचिनि ह्रीं ठः ठः ठः उच्छिष्टचाण्डालिनि, ओं ह्रीं बगलामुखि सर्वदुष्टानां मुखं वाचं स्त म्भय जिह्वां कीलय कीलय बुद्धिं नाशय ह्रीं ओं स्वाहा बगले, ऐं श्रीं ह्रीं क्लीं धनलक्ष्मि ओं ह्रीं ऐं ह्रीं ओं सरस्वत्यै नमः सरस्वति, आ ह्रीं हूं भुवनेश्वरि, ओं ह्रीं श्रीं हूं क्लीं आं अश्वारूढायै फट् फट् स्वाहा अश्वारूढे, ओं ऐं ह्रीं नित्यक्लिन्ने मदद्रवे ऐं ह्रीं स्वाहा नित्यक्लिन्ने । स्त्रीं क्षमकलह्रहसयूं.... (बालाकूट)... (बगलाकूट )... ( त्वरिताकूट) जय भैरवि श्रीं ह्रीं ऐं ब्लूं ग्लौः अं आं इं राजदेवि राजलक्ष्मि ग्लं ग्लां ग्लिं ग्लीं ग्लुं ग्लूं ग्लं ग्लं ग्लू ग्लें ग्लैं ग्लों ग्लौं ग्ल: क्लीं श्रीं श्रीं ऐं ह्रीं क्लीं पौं राजराजेश्वरि ज्वल ज्वल शूलिनि दुष्टग्रहं ग्रस स्वाहा शूलिनि, ह्रीं महाचण्डयोगेश्वरि श्रीं श्रीं श्रीं फट् फट् फट् फट् फट् जय महाचण्ड- योगेश्वरि, श्रीं ह्रीं क्लीं प्लूं ऐं ह्रीं क्लीं पौं क्षीं क्लीं सिद्धिलक्ष्म्यै नमः क्लीं पौं ह्रीं ऐं राज्यसिद्धिलक्ष्मि ओं क्रः हूं आं क्रों स्त्रीं हूं क्षौं ह्रां फट्... ( त्वरिताकूट )... (नक्षत्र- कूट )... सकहलमक्षखवूं ... ( ग्रहकूट )... म्लकहक्षरस्त्री... (काम्यकूट)... यम्लवी... (पार्श्वकूट)... (कामकूट)... ग्लक्षकमहव्यऊं हहव्यकऊं मफ़लहलहखफूं म्लव्य्रवऊं.... (शङ्खकूट )... म्लक्षकसहहूं क्षम्लब्रसहस्हक्षक्लस्त्रीं रक्षलहमसहकब्रूं... (मत्स्यकूट ).... (त्रिशूलकूट)... झसखग्रमऊ हृक्ष्मली ह्रीं ह्रीं हूं क्लीं स्त्रीं ऐं क्रौं छ्री फ्रें क्रीं ग्लक्षक- महव्यऊ हूं अघोरे सिद्धिं मे देहि दापय स्वाअघोरे, ओं नमश्चा ओं नमश्चामुण्डे ameya jaywant narvekar करङ्किणि करङ्कमालाधारिणि किं किं विलम्बसे भगवति, शुष्काननि खं खं अन्त्रकरावनद्धे भो भो वल्ग वल्ग कृष्णभुजङ्गवेष्टिततनुलम्बकपाले हृष्ट हृष्ट हट्ट हट्ट पत पत पताकाहस्ते ज्वल ज्वल ज्वालामुखि अनलनखखट्वाङ्गधारिणि हाहा चट्ट चट्ट हूं हूं अट्टाट्टहासिनि उड्ड उड्ड वेतालमुख अकि अकि स्फुलिङ्गपिङ्गलाक्षि चल चल चालय चालय करङ्क- मालिनि नमोऽस्तु ते स्वाहा विश्वलक्ष्मि, ओं ह्रीं क्षीं द्रीं शीं क्रीं हूं फट् यन्त्रप्रमथिनि ख्फ्रें लीं श्रीं क्रीं ओं ह्रीं फ्रें चण्डयोगेश्वरि कालि फ्रें नमः चण्डयोगेश्वरि, ह्रीं हूं फट् महाचण्डभैरवि ह्रीं हूं फट् स्वाहा महाचण्डभैरवि, ऐं ameya jaywant narvekar
Hi! I love comments, they're the best!